Edgebander Chipping on the Side of the Panel
Experiencing chipped laminate, torn edges or a small lip on panels after edge banding? The cause may be related to CNC nesting, onion-skin cutting, panel handling or the edgebander's trimming process. Learn what to inspect before making machine adjustments.
Request Technical Support Call 1300 4 FORZAWhy Does Chipping Occur After Edge Banding?
Chipping can occur when the brittle surface layer of a panel, such as melamine or laminate, breaks away during trimming or edge processing. The damage may appear near the front or rear of the panel, along the edge, or around a previously machined area.
Before adjusting your edgebander, identify exactly where the damage occurs and which machine operation creates it. In some workshops, the problem begins earlier during CNC nesting, when a thin layer of material—often called "onion skin"—is left underneath the panel to help hold small components in place.
If the final CNC pass leaves a small lip, rough edge or loose fibres, the edgebander's end-trimming or other cutting units may catch this material and cause chipping. However, worn tooling, incorrect settings or panel movement can also contribute.
Common Causes of Panel Edge Chipping
Check the complete production process to determine where the damage begins instead of assuming the edgebander is responsible.
Leftover CNC Onion Skin
A thin layer of material left after CNC nesting can form a small ridge or lip. When the panel reaches the edgebander, trimming operations may catch this material and tear the decorative surface.
Rough CNC Cutting Edges
A worn cutting tool, unsuitable feed rate or incorrect machining strategy can leave splinters, breakout or an uneven panel edge before edge banding begins.
Incorrect Final Pass Depth
If the CNC toolpath does not cut cleanly through the remaining material, a small ridge may remain along the bottom or side of the panel.
Worn or Incorrect Tooling
Blunt or damaged cutting tools, trimming saws or other processing tools can contribute to chipped edges. Tool condition and suitability should be checked by a qualified operator or technician.
Panel Movement During Cutting
Inadequate vacuum hold-down, poor support or panel movement during CNC machining can affect the final cut and leave material that tears during later processing.
Edgebander Setup and Adjustment
If the panel edge is clean before edge banding but becomes chipped during processing, inspect the relevant trimming units, tool condition and machine settings according to the manufacturer's instructions.
Inspect the CNC Cut Before Adjusting the Edgebander
If your workshop uses a nesting CNC router, inspect the panel immediately after CNC cutting and before it enters the edgebander. Look for a rough edge, a thin remaining lip, splintering or incomplete separation of the cut material.
If the panel is already chipped or has a rough edge before edge banding, investigate the CNC cutting process first. If the panel is clean before edge banding but becomes damaged during trimming, investigate the relevant edgebander operation.
Inspect the Panel Edge
Examine the panel after nesting. Check for a thin lip, rough fibres, breakout or material that has not been completely cut through.
Review the CNC Toolpath
Ask the CNC operator to review the final contour pass, cutting depth and onion-skin strategy. A suitable final pass should remove the intended remaining material without leaving a ridge.
Check Tool Condition
Inspect the CNC cutting tool for wear or damage and confirm that the tool and machining settings are suitable for the panel material.
Check Panel Hold-Down
Confirm that the panel is adequately supported and held during machining. Check for movement or loss of vacuum hold-down during the final cutting pass.
When Should You Check the Edgebander?
If the CNC-cut edge is clean but chipping occurs during edge banding, the edgebander may require inspection. The correct checks depend on the location of the damage and the machine's configuration.
Identify Where Chipping Starts
Determine whether the damage appears at the front or rear of the panel, along the top or bottom edge, or beside the applied edge band. This helps identify the operation to inspect.
Inspect Trimming Quality
If chipping occurs during end trimming, have the relevant end saws and their settings inspected according to the manufacturer's maintenance procedure.
Check Tooling and Settings
If damage appears along another part of the edge, the relevant trimming or finishing unit may need inspection. Do not change several settings at once; identify the operation responsible first.
Test with a Known-Good Panel
Where safe and appropriate, compare the results using a correctly prepared panel of the same material and thickness. This can help distinguish an upstream cutting problem from a machine setup issue.
Always follow the machine manufacturer's instructions. Isolate the machine before inspection or maintenance that requires access to hazardous areas, and have adjustments or repairs completed by appropriately trained personnel.
How to Reduce Panel Chipping
A consistent CNC-to-edgebander workflow helps reduce material damage, rework and unnecessary machine adjustments.
Complete the Final CNC Cut
Review the nesting strategy so the final pass removes the intended remaining material and leaves a clean, fully cut edge.
Optimise CNC Parameters
Confirm that cutting tools, feed rates, cutting depths and toolpaths are suitable for the material and machine. Make controlled changes and evaluate the results.
Maintain Cutting Tools
Replace or service worn tooling in line with the manufacturer's recommendations. Suitable, sharp tooling helps produce a cleaner edge before banding.
Keep Panels Properly Supported
Review panel positioning and hold-down conditions to help minimise movement during CNC machining and subsequent handling.
Check the Edgebander Systematically
If the problem begins during edge banding, inspect the relevant cutting and finishing stations rather than changing unrelated machine settings.
Record the Results
Record the panel material, thickness, CNC program and location of the damage. Photos of the panel before and after banding can help the technician diagnose the problem.
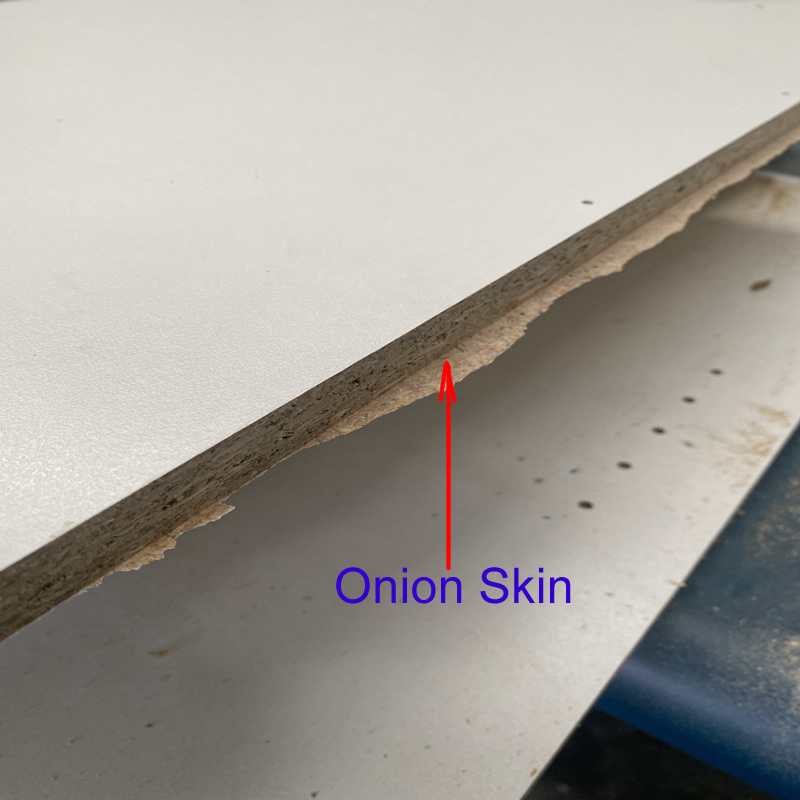
Check for Onion Skin from CNC machines cut.
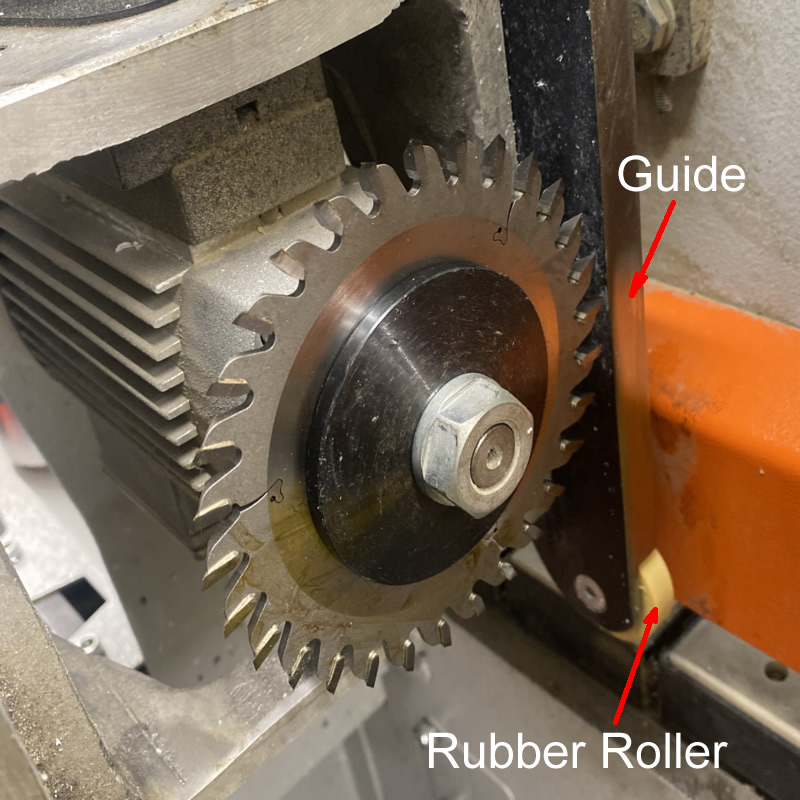
Check edgebanders end saw Guide and Rubber Roller.
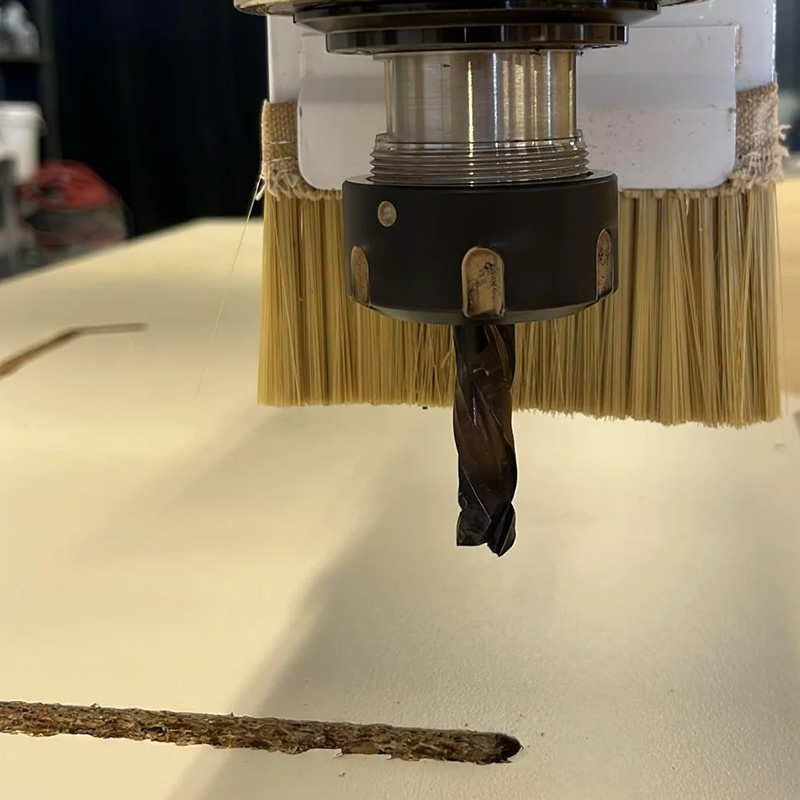
Check the cnc router bit length and quality.
Still Experiencing Chipping After Edge Banding?
If the CNC edge is clean but chipping continues during processing, or if the cause is unclear, Forza Machinery can help you identify the next steps for your woodworking machinery.
CNC Cutting Problems
Get help investigating rough edges, leftover onion skin and other machining issues that may affect downstream processing.
Edgebander Repairs
Request assistance if the problem appears to originate from a trimming or finishing station on your edgebander.
Machinery Service
Discuss inspection, maintenance or repair requirements for woodworking machinery used in your production process.
More Edgebander Troubleshooting
Read more about common edgebander operating problems and technical support from Forza Machinery.
Edgebander Not Starting
Learn what to check when the edgebander will not start even though no error is displayed on the controller.
Read troubleshooting guide →Edgebander Repairs
Find information about professional edgebander repair and service support.
Explore repair services →Woodworking Machinery Support
Explore Forza Machinery's technical support resources for woodworking equipment.
Visit technical support →Need Expert Advice on Woodworking Machinery?
Speak with the Forza Machinery team today for machinery recommendations, pricing, installation options and technical support.